Hello Papercrafters,
I have something a little different to share today.....I got a wild hair, lol and decided to make use of my recipe card stamp set, and the envelope punch board. I just love making the file tabs, lol, and I've made several cards and was looking for another project. I wanted my box to be sturdy since recipes get a lot of use, they should anyway, so I set out to create a box that would accommodate the recipe cards and dividers. It took a piece of 12" x 12 " cs plus a little more for the box, then I decorated it with dsp and some of the scrappin kit freebies I earned with the book-a-thon, I chose blue & yellow so that it would match my kitchen.
Here's a closer view of the cards....
(For a close-up view just click on the photos)
I love the way it turned out, I think these would make fabulous gifts.....for mom's grandma's, or perhaps for newlyweds, you could include some family recipes to get them started.
If you would like to know how I made the box just leave a comment and I will share the details with you.
Thanks for stopping by and have a wonderful day!
Tamara
Hello Papercrafters,
I'm trying to get back into my regular schedule of crafting and posting, even though it's a bit difficult with my girls still on winter break......they keep me hopping and it's hard to keep up.......but with the holidays behind us I have been escaping to my crafty fortress and creating some new goodies. Today I thought I would continue the Valentine theme and share some of the gift cards I created for a Valentine Boutique I will be participating in.........these are 3" x 3 " mini cards and they fit nicely in SU's mini envelopes. These are great to add to a gift and are blank inside so you may personalize to your liking.

I kept them simple with some stamping and a touch of bling, if you stamped a sentiment on the inside you could turn them into Mini Valentines for co-workers, friends, or class parties....and let the kids make their own.
I worked with the 'Love you more' and 'Quite the pair' stamp sets...... the 'Love you more is only available for a limited time, that's where that cute bird with heart in his beak came from......here's the #131853 clear $16.95 & #131850 wood $ 21.95.
Thanks for stopping by, have a wonderful day!
Tamara
Hello Papercrafters,
January is well upon us and the holidays are all tucked away till next year.....so it's time to start getting ready for Valentines Day, and it will be here before you know it. So I've been working on some new designs for 2014, today's card is really quite simple to create, I used SU framelits 'Hearts a Flutter' to die cut the banner shapes and my dsp is from the new Occasions catalog, it's the 'fresh prints' stack. There are lots of nice patterns and bright springy colors in this stack all are double sided too!
Here's the front
I also added a bit of sewing to attach the banner.....I love the look, simply sweet.
On the inside I used the mini punch for the hearts and stamped the sentiment.
I hope everyone is having a wonderful 2014 so far...Happy New Year!!
Thanks for stopping by,
Tamara
Hello Papercrafters,
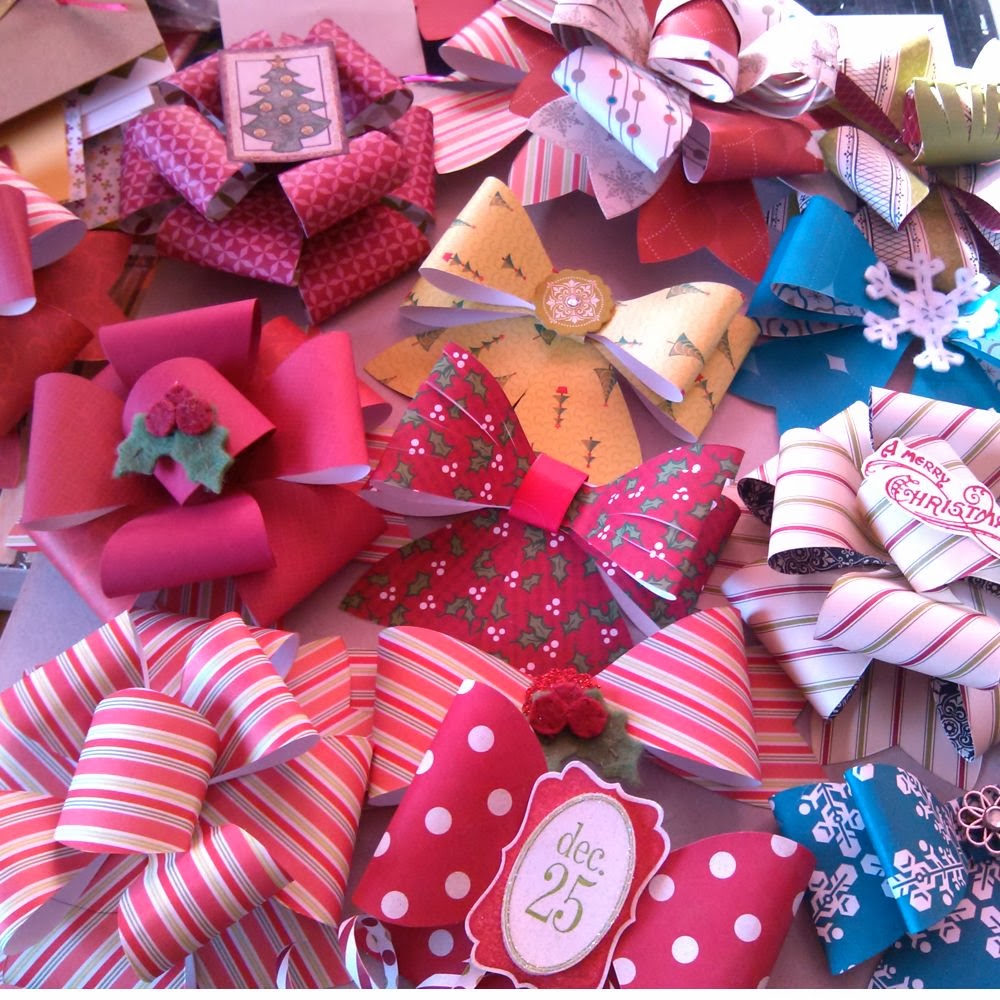
I am playing catch up with my posts, plus I wanted to share some of the awesome bows I created with the new Bow die in our holiday mini, I made a bunch of these so I could use them on all my gifts. There are lots of options with the type of paper and embellishments you use....the more I made the more ideas I got........
I think they are gorgeous and they are fun to make, this die is something I will get alot of use out of, this girl will not be buying anymore bows :) just call me the happy bow maker, lol.....
Have a wonderful day!
Merry Christmas!!
Tamara
Hello Papercrafters,
I'm so sorry for the delay in posting this, with the holidays and being sick I'm finally getting around to it, I created a photo tutorial, it was just faster and easier with all the activity going on around me.
This box is really easy to create and works great for treats, jewelry or other small little trinkets for gifting. You will start with a piece of dsp cut at 6" x 6"
You will then line up the 1 3/4 " line, punch and score, then you just slide your dsp over to the 3 1/8" punch and score....keep sliding to the 4 1/2 " punch and score.....
Now you will turn, line up to the score lines you made, then punch and score, make sure you do this on each score line you made, this step will be completed on each remaining side.
You will end up with this shape, I am using a piece of white paper above to show you where you do your trimming. As you can see you will end up with 2 tabs more narrow than the other 2, you will remove the 2 smaller tabs, just continue to remove the pieces that I have illustrated above......
Here you can easily see what you will need to remove, then just fold all score lines, the 2 large tabs will be the top......
As you can see from this photo I used the mini scallop punch to create a handle in the tabs, I also used a hole punch to attach the ribbon so it can be tied closed. Then just decorate and embellish as you like, of course with a swap out of dsp this can be made for any occasion. Enjoy!

Thanks for stopping by I hope you all have a wonderful Merry Christmas full of much love, laughter, and merriment!
Have a wonderful day!
Tamara
Hello Papercrafters,
Happy Saturday! I have been so busy with the holidays plus I have been doing demo's at a local boutique, which is fun but takes some preparation. Then I caught the cold/flu that my lovely daughters brought home from school, lucky me, so for a couple days I accomplished absolutely nothing ;/, but today I am feeling a little better so I am playing catch up and trying to get back on task, lol.
I thought I would share the cute little gift box I made with the Envelope punch board, this is what I demoed at the boutique before I got sick..............this little box is so cute and could be used for jewelry, candy or other small gifts. I also made an envelope that fits a gift card perfectly and everyone knows how popular gift cards are for the holidays and gift giving, I sell lots of decorated gift card holders, love this punch board!.......I keep finding more and more ways to use it, if you don't already own one don't miss out its a great investment.
(You can click on the photo for a closeup view)
I will work on a photo tutorial today so that I can share this cute little favor box with you all.....
I have much to do, when I am out of order for a couple of days the house really suffers, lol.
Have a great day!
Tamara
Hello Papercrafters,
I am finally back with the video and instructions for the box I created for the blog hop that holds the tea-light holder/card......I found that it also holds greeting cards 4 1/4" x 5 1/2", you can put 4 to 6 cards in the box depending on the thickness and embellishments. These are fabulous for gifts, I make sets of matching cards for various occasions and create a matching box for them to go into, then the recipient has cards for birthdays, thank you's, new baby, etc. I've also created some sets for the holidays that have matching cards and tags.
Here are the measurements for the box:
for the bottom cut dsp or cs-7 1/2" x 6 1/2 " score at 1" on all sides
for the top cut dsp or cs- 6 3/4" x 5 1/2" score at 1/2" on sll sides
and for the tea-light holder card:
cut cs- 10 1/2" x 6 1/2"
on 10 1/2" side score at 1/2", 1 1/4", 3", 3 3/4", 7 7/8"
on the 6 1/2" side score both ends at 1/2"
Here is the video:
I am working on several new items for a local holiday boutique I'm selling and demoing at, I will be sharing some of my new goodies with you here, please stop by and see what's new!
Thanks for stopping by, have a wonderful day!
Tamara