Hello Papercrafters,
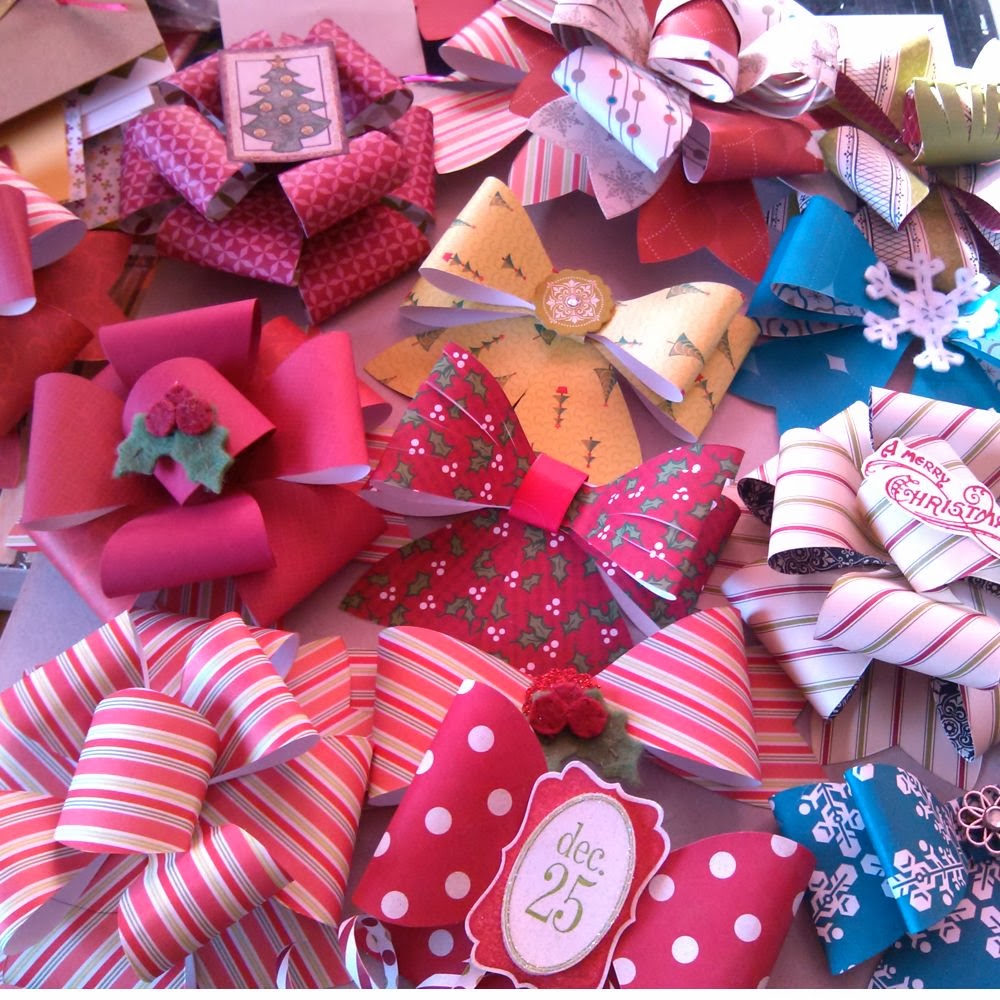
I am playing catch up with my posts, plus I wanted to share some of the awesome bows I created with the new Bow die in our holiday mini, I made a bunch of these so I could use them on all my gifts. There are lots of options with the type of paper and embellishments you use....the more I made the more ideas I got........
I think they are gorgeous and they are fun to make, this die is something I will get alot of use out of, this girl will not be buying anymore bows :) just call me the happy bow maker, lol.....
Have a wonderful day!
Merry Christmas!!
Tamara
Hello Papercrafters,
I'm so sorry for the delay in posting this, with the holidays and being sick I'm finally getting around to it, I created a photo tutorial, it was just faster and easier with all the activity going on around me.
This box is really easy to create and works great for treats, jewelry or other small little trinkets for gifting. You will start with a piece of dsp cut at 6" x 6"
You will then line up the 1 3/4 " line, punch and score, then you just slide your dsp over to the 3 1/8" punch and score....keep sliding to the 4 1/2 " punch and score.....
Now you will turn, line up to the score lines you made, then punch and score, make sure you do this on each score line you made, this step will be completed on each remaining side.
You will end up with this shape, I am using a piece of white paper above to show you where you do your trimming. As you can see you will end up with 2 tabs more narrow than the other 2, you will remove the 2 smaller tabs, just continue to remove the pieces that I have illustrated above......
Here you can easily see what you will need to remove, then just fold all score lines, the 2 large tabs will be the top......
As you can see from this photo I used the mini scallop punch to create a handle in the tabs, I also used a hole punch to attach the ribbon so it can be tied closed. Then just decorate and embellish as you like, of course with a swap out of dsp this can be made for any occasion. Enjoy!

Thanks for stopping by I hope you all have a wonderful Merry Christmas full of much love, laughter, and merriment!
Have a wonderful day!
Tamara
Hello Papercrafters,
Happy Saturday! I have been so busy with the holidays plus I have been doing demo's at a local boutique, which is fun but takes some preparation. Then I caught the cold/flu that my lovely daughters brought home from school, lucky me, so for a couple days I accomplished absolutely nothing ;/, but today I am feeling a little better so I am playing catch up and trying to get back on task, lol.
I thought I would share the cute little gift box I made with the Envelope punch board, this is what I demoed at the boutique before I got sick..............this little box is so cute and could be used for jewelry, candy or other small gifts. I also made an envelope that fits a gift card perfectly and everyone knows how popular gift cards are for the holidays and gift giving, I sell lots of decorated gift card holders, love this punch board!.......I keep finding more and more ways to use it, if you don't already own one don't miss out its a great investment.
(You can click on the photo for a closeup view)
I will work on a photo tutorial today so that I can share this cute little favor box with you all.....
I have much to do, when I am out of order for a couple of days the house really suffers, lol.
Have a great day!
Tamara
Hello Papercrafters,
I am finally back with the video and instructions for the box I created for the blog hop that holds the tea-light holder/card......I found that it also holds greeting cards 4 1/4" x 5 1/2", you can put 4 to 6 cards in the box depending on the thickness and embellishments. These are fabulous for gifts, I make sets of matching cards for various occasions and create a matching box for them to go into, then the recipient has cards for birthdays, thank you's, new baby, etc. I've also created some sets for the holidays that have matching cards and tags.
Here are the measurements for the box:
for the bottom cut dsp or cs-7 1/2" x 6 1/2 " score at 1" on all sides
for the top cut dsp or cs- 6 3/4" x 5 1/2" score at 1/2" on sll sides
and for the tea-light holder card:
cut cs- 10 1/2" x 6 1/2"
on 10 1/2" side score at 1/2", 1 1/4", 3", 3 3/4", 7 7/8"
on the 6 1/2" side score both ends at 1/2"
Here is the video:
I am working on several new items for a local holiday boutique I'm selling and demoing at, I will be sharing some of my new goodies with you here, please stop by and see what's new!
Thanks for stopping by, have a wonderful day!
Tamara
Hello Papercrafters,
Happy Monday! Well the kiddos are home for the Thanksgiving holiday and amazingly enough I was actually able to get into my craft room and create a card for the demo color challenge for my fb demo group. What a mess I had to work in, I did a workshop/boutique on Saturday and the days up to the boutique I wreaked havoc on my craft room, it still needs a good reorganizing because I just moved some things aside to give myself room to work :( but I sold alot of cards, tags and snowman soup which made me so happy!, I'm looking forward to more boutiques.
The colors for the challenge were rich razzleberry, pistachio pudding, and always artichoke.............now I didn't have any of the artichoke so I used gumball green in it's place. I decided to go with a holiday theme since they are so quickly approaching and I think the razzleberry works well for a holiday card.....here is the front:
I created the border with 2 nestabilities dies so I decided to use the leftover piece to decorate the inside of the card, then I added an ornament and stamped on the greeting.
It's a simple but sweet card that has a very festive feel to it. I used the 'ornament keepsakes' and 'christmas messages' stamp sets, and the sizzlit leaves die, plus I added some pearl bling.
I am working to get the video done of my tealight boxed set and hope to have it uploaded by the end of the week, I appreciate your patience, the workshop boutique I did Saturday was booked because of SU's bookathon, so it kind of got in the way of my video, but I did earn some grab bags of retired goodies, I'm so excited about that, plus I sold a bow die and some pretty presents bow kits!
Thank you for stopping by,
Have a wonderful day!
Tamara
Hello Papercrafters,
Happy Wednesday, my this week is flying by, harvest work is keeping me busy and in between work I am getting as much crafting done as I can for a boutique that I will be participating in on Saturday. Since I created the box for my tea-light candle I discovered it also hold 4 to 5 cards depending on how thick the embellishments are, so I have created a few card sets in a matching box, I thought they would be great for gifts, I will be sharing some of these creations in the coming weeks but for today I will be sharing some cute birthday invitations I created recently.
With the holidays coming up well everyone is sharing lots of Christmas, wintery, holiday creations, but birthdays and other occasions happen all through the year, I decided to make a more boy friendly version in blues and greens and the girl version is in pink........
For the girls:
and on the inside:
For the boys:
the inside of the boys version is the same as the girls except the balloons and hat are in blue and green.
This invitation is super sweet and super easy to create, the rosette in the middle takes the most time, although if you have the rosette die is does save a bit of time.
I used the stamp set 'sketched birthday' and the dsp 'birthday basics'.
Thanks for stopping by, I hope you have a wonderful day!
Tamara
Hello Papercrafters,
I'm back to share another greeting I created for my fb group, we are all SU demo's and the group is for sharing and supporting each other. We often have color challenges to help with gain design ideas from each other. The card I created for today's post was the result of one of those challenges. I believe the colors were baked brown sugar, primrose and ivory........since at the time I had not used my new mosaic embossing folder I decided I would use that in my design, after embossing I used a dauber to rub a little of the brown sugar on the embossing so it would add a little depth the the edges. I stamped then fussy cut the flowers out and made an arrangement of them on the front, to create the leaves I just simply cut them out of card stock then added some vein lines. And it just felt like it needed a little pearl bling.
I wanted to carry the look into the inside of the greeting so a added ivory cs and used the corner punch on them to fancy it up, stamped the sentiment then added another of the large flowers I used on the front.
The colors actually work well for a fall birthday greeting.
Thanks for stopping by and have a wonderful day!
Tamara
Hello Papercrafters,
Happy Tuesday all! We had another busy day on the farm but I still wanted to share one of my creations with you. I created this card for a swap I participated several weeks ago now, but with all the hops and videos I am just finding the time to share it.
To create the card I used the set 'Kind & Cosy' from our new IBC, in fact that was what the theme of the swap was....to use something new from the IBC.......well I really loved that set when I saw it, maybe it was the gingham but anyway I decided I would use it to create my swap.
Another new item I love was the ruffled ribbon, it's so pretty and I love the pool party so that was what I decided to use in my design. I also liked the way the 'Morning Meadow' hostess set went with the flowers in the 'Kind & Cosy' set so I used them on my background, before stamping I used my SU markers in summer starfruit and gumball green to color the stamp. I added some tiny pearl bling to some of the flowers.
I also used the vintage buttons and some twine, I really love this design and way the colors coordinate. I did have to do a lot of fussy cutting around the flowers and the cups, but I really like just seeing the image and not a lot of card stock, which is fine for a few but I would recommend too much fussy cutting if your doing a large swap.
And here is the whole set, I had to make about 7 of them.
If you haven't got this set yet you should try it out the gingham circle works great for adding a circle frame to alot of other stamps and can be stamped in a variety of colors, I did a card with it that I stamped in black and it was gorgeous....in my humble opinion :)
Thanks for stopping by, Have a wonderful day!
Tamara
Hello Papercrafters,
Happy Saturday to you all, sorry for being so late getting this posted, but I was so tired after getting back from camp from all the trekking around in the forest that I just needed a lot of extra rest. Wow it was incredible I think I learned as much as the kids did, of course they encouraged and asked us to join in the activities. We were on the move from 7 in the morning till 8 at night and most all the classes were conducted outside, although we were inside for the 'arrowhead' and 'earth and beyond' classes. Here the kids are in one of the 'class rooms' :) my daughter is the one in shades looking at the camera..
This was what we were walking around in all day....heavenly.....I have many more photos, but they are still on the sd card, but I will be sharing some of my favorites in the coming weeks.
Here we are taking a selfie of us in the forest...
I hope you all enjoyed the hop I had so many wonderful comments, thank you thank you!, they are so appreciated! I was so happy to get back to my computer so I could catch up with all the activity.
I numbered all your comments and used a random generator to pick the Winner of the Blog Candy!!! and the Winner is.....................
Regina!!! her comment was:
these are more than beautiful! Perfect for the Christmas tree!
Thank you so much, I loved the way the ornaments turned out too, can't wait to make more :)
I will try to contact you by email....if you read this post then please contact me at: papercraftingstamper@gmail.com and tell me your physical address so that I can get your package posted.....note: we have a holiday on Monday, so I will not be able to ship until Tuesday.
Many thanks to all of you that left comments and thank you for following my blog! We are planning on another hop the beginning of December so I encourage you to check back I will be announcing the details asap.....and since it is December I will most definitely be giving blog candy away!!!....just call me Tami Claus, lol.
All silliness aside I will be posting new goodies as I get them made so I hope you will stop by and see what I'm up to.........
Have a wonderful weekend!!!!
Tamara
Hello Papercrafters,
Welcome to day 3 of our Glitter Queen's Blog Hop! I hope your enjoying all the awesome paper crafts everyone has been sharing, I can't wait to get back home so I can hop around to everyone's blogs, I am still in Sonora and having a great time, but I will be so ready to get back home, to my own bed and I'm sure I'm missing my computer and phone service, lol.
Today I have a Wintery version of the tea-light candle card and box I created for our last hop with the Fall theme, the design is something I cased on the internet although when I created the fall set I noticed the box was a little wider then the card/candle holder. So when I created this set I re-engineered the box to fit my card/candle holder better, took a bit of trial and error but I ended up with a box that fits the card perfectly :-)

The video for this project will be ready later this month, bear with me I've been preparing for this hop and I'm still helping my husband with harvest plus I have had several dr. appt's lately...all just check-up's, but time consuming all the same.
I used the dsp 'Winter frost' and our silver glitter paper to create the box and card, my card base is 'island indigo' cs, the sentiments were from the 'Christmas messages' set in the holiday mini, on the top front of the box I used the framlits 'labels' collection and made 3 layers with them, I love this layout so much that I think I will make a card using this design (smiles) the small snowflakes and stars are from an older small die I have, I used the silver glitter paper for these, they are so pretty and sparkly.
On the card front I used the framelits 'ornaments' collection and 'island indigo' to make the ornament then I added some of the foil dsp from the 'winter frost' dsp, I added a twine bow and a rhinestone to the sentiment for a little extra sparkle.
On the inside of the card, the sentiment was stamped on whisper white and punched out with the artisan punch and I also used more of the 'winter frost' dsp
This would make a great gift, I need to get busy with the video, the video will be of this winter version since the big day is coming soon, yikes.
Thank you so much for joining us for our Winter hop, we plan on doing another hop the first week of December, so keep that in mind and mark your calenders.
If you have been commenting on my projects, many thanks, I look forward to reading them upon my return, and be sure to join me on Saturday when I announce the Winner of my blog candy!!! I have a nice package of goodies for crafting with, it has a selection of 6"x 6" 'winter frost' dsp, some 'season of style' stack, 2 yds. silver 1/8" ribbon, 2 yds. 1/4" real red ribbon, 2 yds. of twine, plus some buttons and embellishments.....I even added a few of my leftover snowflakes :-)
Be sure to check out my Holiday shares bundle, it has dsp, ribbon, embellishments, boxes, and muslin bags! ( see the details on my Oct. 30 post or on the sidebar of my blog......oh and if you buy a share you will have a 1 in 10 chance of winning the stamp set 'oh goodie' I will choose the winner with a random generator and send the set along with the winner's share bundle!!
This is the end of our hop, thanks for stopping by, and now back to Dawn...........
Enjoy your day!
Tamara
Hello Papercrafters,
Welcome to Day 2 of our Glitter Queen's Blog Hop! It's so nice that you have stopped by for day 2, I am so inspired by yesterday's fabulous goodies I can't wait to see what everyone has for today, unfortunately I will not be able to see day 2 and 3 till I get back.......as you are reading this I am on my way to Sonora, I am a chaperone for my daughter's 6th grade camping trip :-) we will be back on Friday late afternoon, I will be anxious to see what has been shared on days 2 and 3 as well as comments! On Saturday I will announce my winner of my blog candy!
For today I have some sweet ornaments I made using the 'Color me Christmas' set from the mini, I had originally planned on making 5 using all the images in the set but the constraints of time, work, and preparing for the camping trip, I only got 3 made......the other two I will save for a future post. I stamped my images on a watercolor paper and I used my acrylics to color them in, of course our SU markers or copics would work equally as well.....as I was brainstorming this idea I thought the images would work great on the rosettes, now I made mine by hand using dsp cut at 1 1/4" x 12" then score every 1/4"....but if you have the rosette die for the big shot that is so awesome and makes it so much easier, but I have many other goodies on my wish list that take priority over the rosette, lol, perhaps there is one in my future!
I wanted to add some bling so I decided to use the silver glitter paper, oh my this is another of my loves.....this paper is gorgeous and makes your projects just pop beautifully.
For the reindeer and the present ornaments I added a sentiment to the back using the 'Christmas messages' set, but for the tree I just put a tree on the front and back.
Here is the reindeer:


Here is the present:
Here is the tree:
And the group together:
I'm just missing the stocking and the santa but will work on those when I return...........I hope I've inspired you to make some of your own ornaments, I think they look fabulous and I can't wait till I get to try them out on our Christmas tree..........they would actually make a great gift, in fact I think I will make a set for my mom :-)
Thank you for stopping by, don't forget to follow and comment, blog candy may be in your future!
I will share more about that tomorrow...........please come back by I have another 3-d project to share!
Have a wonderful day!
Tamara
That's the end of our hop, thanks for stopping by, and now back to Dawn........
Hello Papercrafters,
Welcome to Day 1 of our Glitter Queen's Blog Hop! I'm so glad you are joining us today, these hops are always so much fun and they are so inspiring, I love seeing everyone else's idea's. I have different projects for each day so be sure to come back for all 3 days!
Our theme for this hop is Winter so I have created a couple of greeting cards for Christmas, to create my cards I used the 'Winter frost' dsp.....I love love love this dsp.....and the foil papers included are gorgeous, I also used the stamp sets 'Christmas messages', 'Color me Christmas' and 'Seasonal sayings', of course I needed embellishments, I used some white satin ribbon, vintage faceted buttons, twine, rhinestones and lets not forget the silver glitter paper! .
Here are the greetings:
And on the inside:
Here is my second card:
Don't you love that foil dsp and the silver glitter paper, it's so pretty!
And now for the goodies :-) yes I have some blog candy! All you have to do is follow my blog and leave a comment during the hop, each comment gives you a chance at winning so comment on all my hop posts for more chances!!! I will share a photo of the goodies on day 3!
For anyone interested I have some holiday mini share bundles available-these are only available through me, the details are on my October 30, 2013 post! Or you can see the details in the sidebar on the left. This is an awesome deal, the shares have dsp, ribbon, embellishments, boxes and muslin bags! Be sure to check it out! Plus the shares have a Bonus!
Thank you for stopping by, I hope you enjoyed my cards, I have some 3-d projects for tomorrow, hope to see you then.
Have a wonderful day!
Tamara
That's the end of our hop and now back to Dawn..............
Hello Papercrafters,
Happy Wednesday everyone! We'll it's official, our Glitter Queen's Blog Hop for November will be on the 5th, 6th, & 7th of November! There will be several of us participating, our theme is Christmas & the holidays, I will have different projects for each day and look forward to sharing them with you. I will also be at 6th grade camp with my daughter during the hop, (I will be getting my posts ready over the weekend and scheduling them ahead of time) which will be a little funny and I won't get to see any comments until I return on Friday :(..... but I will be offering some blog candy! Yeaaa!
I'm so excited to also announce that my Holiday Mini shares are now available for pre-order!!!
Here is a list of the share contents:
2 yds. 1"grosgrain ribbon cherry
2 yds. 1/8" silver ribbon
4 clips- old olive embellishments
4-frosted finishes embellishments
12- 6" x 6" sheets of dsp 'season of style'
12- 6" x 6" sheets of dsp 'winter frost'
2- boxes with window
2- muslin bags
All this for just $22.50!!! that includes priority shipping and sales tax
I have 10 Shares Available!
*Share bonus*- For each share purchased you will be entered into a drawing for the 'Oh goodie' stamp set...........this is an awesome bonus, you have a 1 in 10 chance of winning the stamp set! *
* This share/bundle/drawing is only available from me*
All shares purchased from October 30 thru Nov 8, will be ready to ship to you priority on November 15th ; all shares purchased from Nov. 9 thru 15th will be ready to ship to you priority on November 22nd.
*This account is linked to myself and my husband, his email is the default, don't worry when you see his email and not mine..... I set the button is set up to notify me of any sales. * :-)
Today as promised I am back with another Halloween greeting, I made a peekaboo window card, it's so cool, I used the 'Halloween Hello' stamp set, I thought the little flying witch would look cool in the little hidden window, after stamping her I used daubers to add a moon and night sky to her background. For the card base I used black and I spritzed it with the shimmer spray, I love that glittery shimmer on Halloween goodies. My dsp is from the 'Modern Medley' pack.....the prints in this pack work great for Halloween. (If you would like to learn this peekaboo window technique I have a video posted on my blog on Oct. 21, 2013)
Here is the greeting:


The Halloween ticket and the greeting on the inside came from the 'Halloween Bash' stamp set.
I hope you liked my card, you should give this technique a try it's really very easy and fun!
Thanks for stopping by today....tell your friends about my share bundle offer, lot's of cool goodies and the chance to Win Free Stamps!
Have a wonderful day,
Tamara
Hello Papercrafters,
Happy Tuesday! I hope your week is going well so far, we are still harvesting but I am fitting in a little crafting time before work and in the evenings. Yesterday our weather cooled down a lot and I was cold all day, takes a bit to get used to when it comes in so quickly like that, although compared to the day before it was much nicer for working in, all in all I just want to get it done so I can work on the holidays. So much to craft and so little time already, lol.
Today I have a video of my quick and easy Reeses treat favor, they would also hold the large peppermint patties or even 2 hersheys minis placed side by side, I love that they are really easy to make, they are also a great craft project for the kids. I still have 2 daughters in elementary school and we are making a bunch of these for them to take to their Halloween class parties. These would be awesome for showers and parties of all types of occasions. They can be made quickly and take a very small amount of supplies to create. ( I apologize for the lighting, I had to film the video at night)
You will get 3 from a sheet of 8 1/2" x 11" cs, then I just used scraps of cs and dsp to create the tags, then you'll just need some ribbon, a little glitter and some adhesive, it's mainly some cutting and stamping!
Enjoy the video!
Tomorrow I have a Halloween greeting with a peekaboo window!
Thank you for stopping by,
Have a wonderful day!
Tamara
Hello Papercrafters,
Happy Monday, I can't believe how fast October is flying by, Halloween will be here before you know it, so over the weekend I took my girls to town to do some costume shopping, my younger two are going to be Monster High ghouls, lol, and my teen is going to be working in a local haunted house as a zombie :) Halloween is one of my favorite holidays, I've never stopped liking to play dress-up, lol, I think the only time I didn't was for a couple of my teen years, ever since I always dress up, Halloween is as much fun for adults as it is for kids, maybe more, lol.
This week I will be sharing Halloween projects, today I have a greeting card, on this greeting I added some glitter paper that I made myself! I used the new glitter from the holiday mini and the heat and stick powder, oh my this is so cool, now I can make glitter paper in any color of glitter that I have, if you haven't tried this technique out yet you have to try it, it's easy and fun and you will love the results.
Here is my card:

To make the pumpkin I use a circle punch and an oval punch then pieced together, although I trimmed it a bit to make the pumpkin more slender, the stem was hand cut.
On the inside I used a sticker from some steampunk stickers I have........
Tomorrow I have a video to share featuring a favor, you will love these little favors, they are quick and easy and fun to make! So be sure to stop by,
Thanks for stopping by today, have a wonderful spooky week, hehehe :)
Tamara